Map & Trail Notes
Quick Facts:
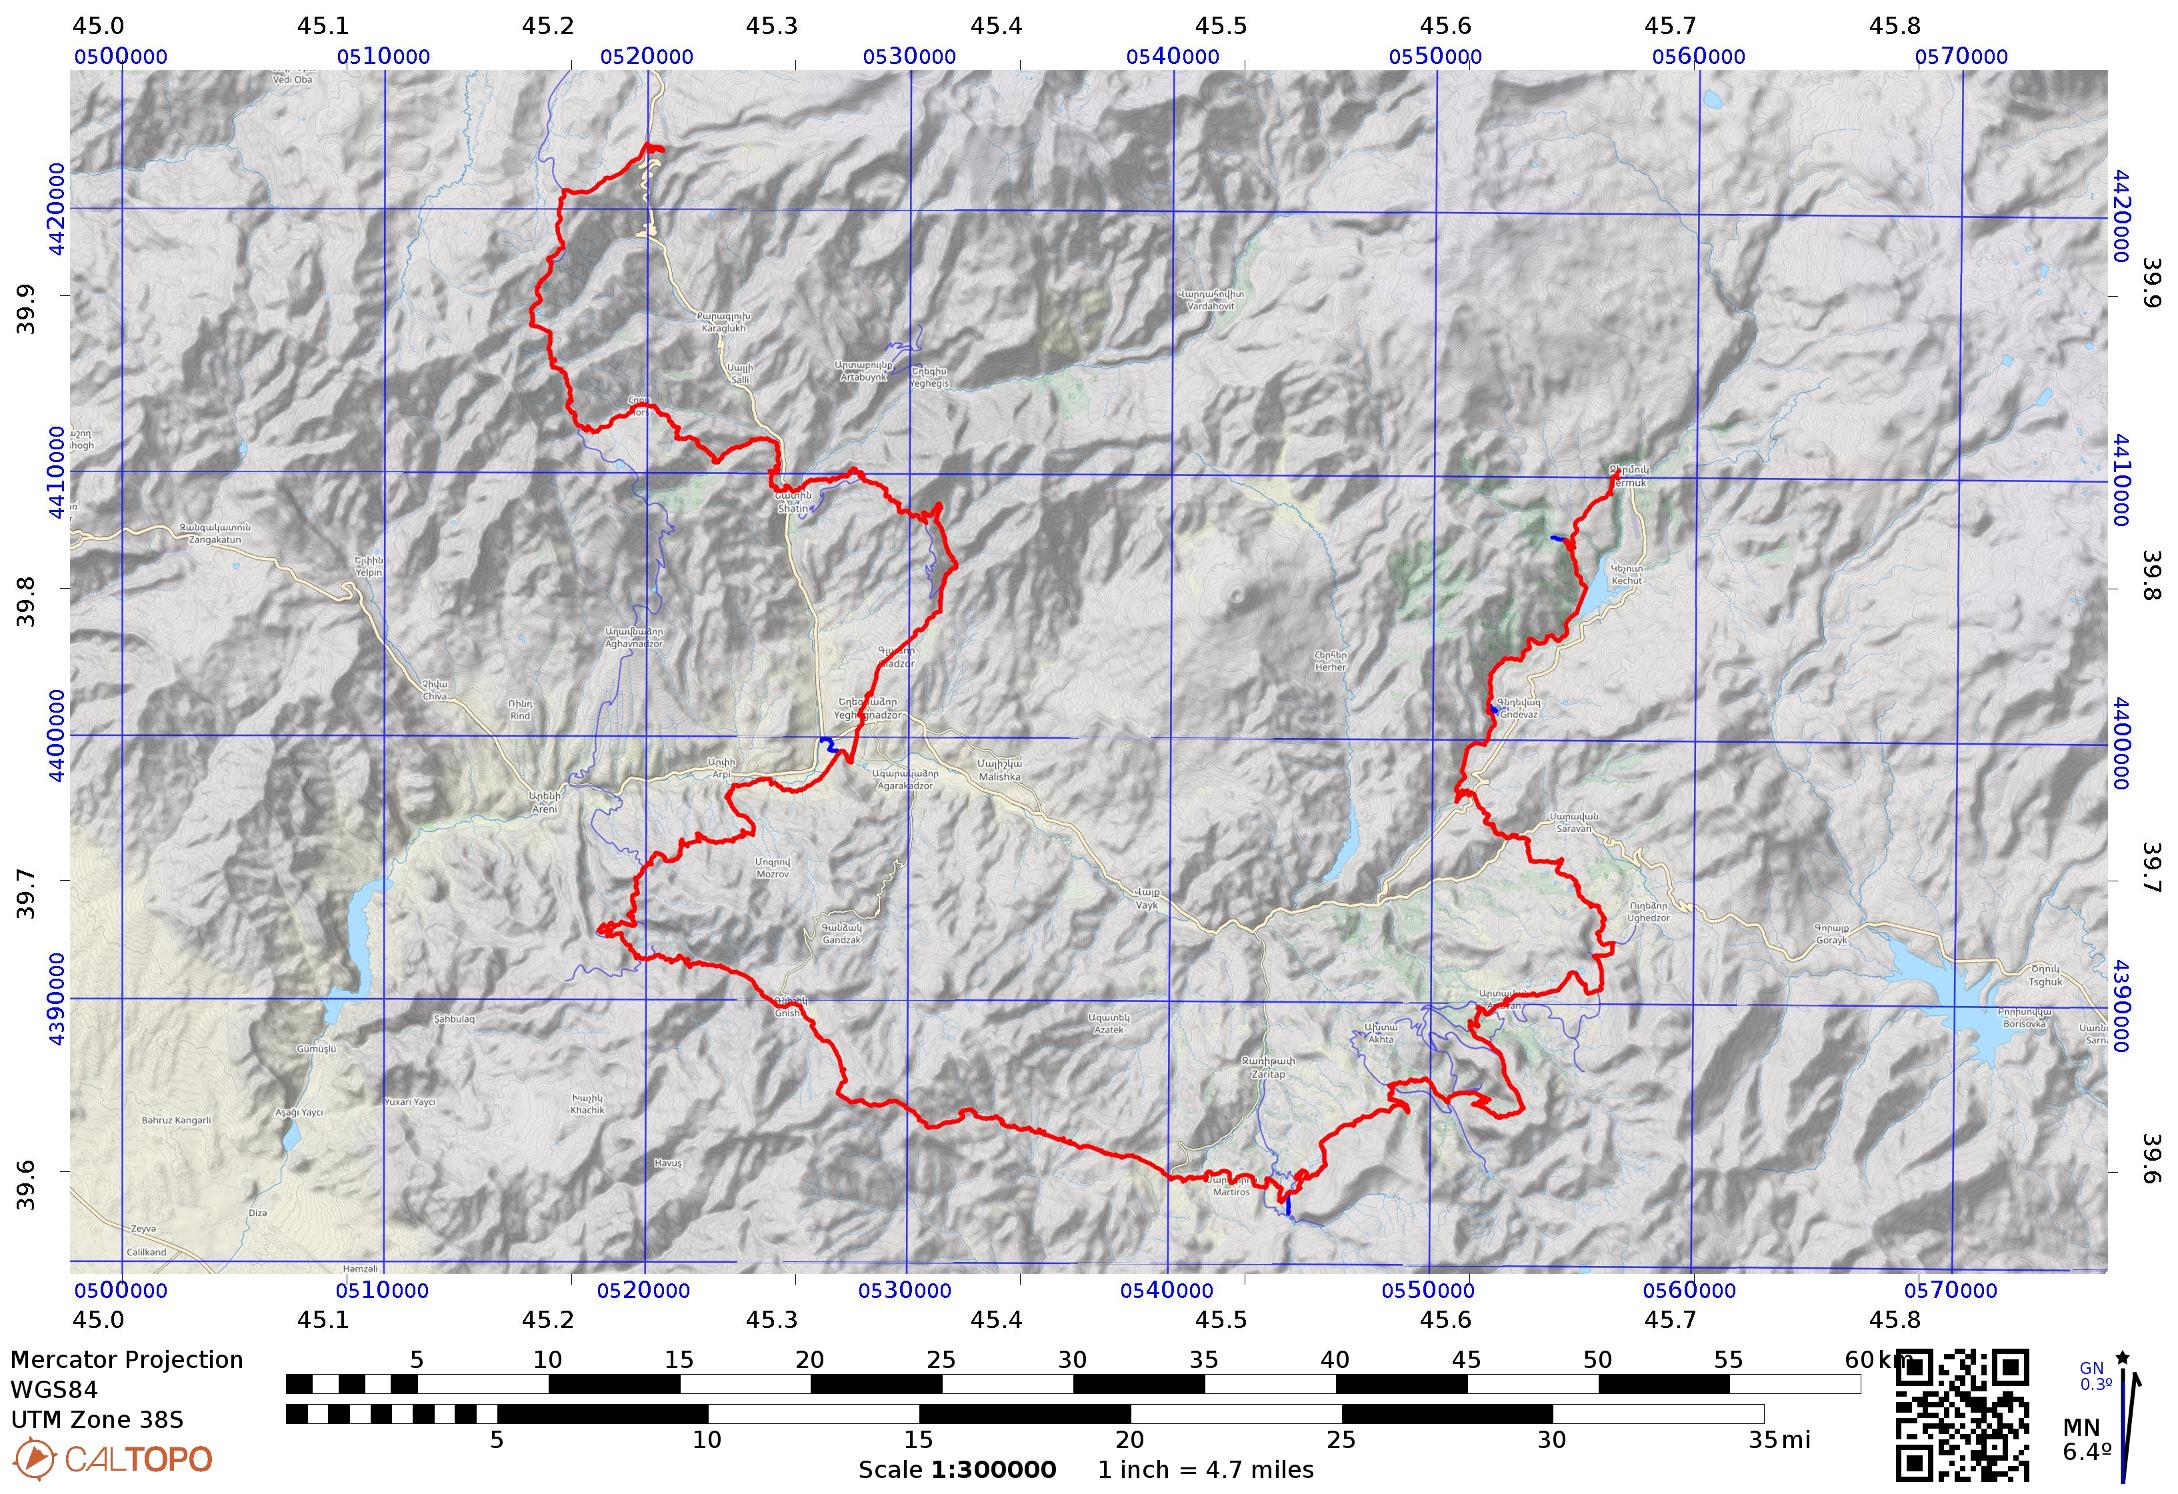
Elevation Gain/Loss: 7,690/7,932m
To download this route in GPX or KML format for GPS devices and smartphone apps, visit the interactive map on CalTopo.com and click the “Export” button.
Trail Notes
Note: The route is described from north to south, but can be hiked in either direction.
Selim Caravanserai (aka: Orbelian Caravanserai)
The dramatic stage of the Transcaucasian Trail through Vayots Dzor begins at a place that has been hosting weary travellers for almost 700 years – the early 14th-century caravanserai traditionally known as Selim and still referred to as such by most locals and in a large canon of literature. (Its modern-day renaming to Orbelian caravanserai – apparently an attempt to erase traces of Islamic influence from the site – refers to the ruling Orbeli dynasty who commissioned it in 1328.)
When the caravanserai was established, this region was part of the southwestern khanate (ie: kingdom) of the Mongol Empire which encompassed much of present-day Iran, Turkey and the Caucasus. While these imperial boundaries were in a constant state of flux, the mercantile road network now known as the Silk Road never lost its significance. Caravanserais were built in strategic locations across the Lesser Caucasus Mountains; this one on an important mountain pass between the trading centers of Jugha (Jolfa) and Tiflis (Tbilisi).
Restored in the 1950s, the dark basalt structure’s well-preserved interior evokes images of pack animals stabled along the central nave, being fed and watered from stone troughs, with travellers storing their wares and bedding down in the many side alcoves. The single small entrance was a deliberate feature to make the defence of the building easier from within. Outside, the views south across Vayots Dzor province from just below the pass are nothing short of spectacular.
The caretaker of the site sells local produce from a stall in the parking area during the tourist season, and is usually happy to allow camping in the area surrounding the site (though it’s polite to ask if he is there when you arrive). There are no toilet facilities, though there is a picnic bench and a trash can. A freshwater spring can be found by crossing the road behind the building and walking a little way uphill and E. If this source is dry, another water source connected to an underground cistern can be found by following the suggested trail route about 500m SW along the dirt track from the paved road over the pass itself. Adventurous travellers have also reported bivvying inside the caravanserai itself.
Selim Caravanserai – Hors
From the entrance to the caravanserai parking area, walk up the paved road to the pass itself, then turn SW as the road heads N to follow a jeep track. The track passes several good water sources and then climbs to cross the ridge after 3.5km.
From the junction on the Vardenyats ridge, head S on the well-used 4×4 track, which follows the ridge as it climbs. After about 2.5km you’ll round a spur and begin to bear SW as the track traces the provincial border between Gegharkunik and Vayots Dzor. The track traverses below the ridge for about 800m, then forks, with the right fork leading back up to the top of the ridge. Take the left fork and follow it down and SE for about 220m to reach a lower track which passes just above a small area of wetland fed by a stream.
Head S from here, following the track as it traverses the hillside and bears SW through patches of wildflower meadow. The route contours around the curved southeastern flanks of Mknasar (2,946m), crossing several side valleys and streams, and passing above more wetland areas below.
The trail departs from this 4×4 track just beyond the vegetable gardens near a farmhouse a short distance away to your right. You’ll follow the 4×4 track 700m in a straight line to the SE, at which point the track itself bends to the left to traverse around a spur. Instead, turn right off the track and walk SE up the hillside towards the notch in the spur, no more than 100m away. From this viewpoint, a footpath descends S on the far side, skirting the top edge of more fields, and rejoining the 4×4 track about 550m later.
Follow the track down to cross a stream. After about 350m you’ll reach a fork in the track on top of a small spur, with a stone guidepost set in the ground to your left. Turn right and steeply uphill for a short distance, then following the track as it bends S, joins another track and becomes more substantial. This track now parallels the one you were previously following in a SE direction, meeting it again after about 1.3km. Wildflower meadows and haymaking will become more frequent features of the landscape as you continue S in parallel with the mountainside to your right, descending on occasional zigzags towards lower ground. You’ll soon see a single building at the foot of the mountainside ahead of you; this is the Hors Conservation Area Visitor Centre, which also acts as a guesthouse for pre-booked groups. The track bears SE before reaching the building, passing its driveway entrance at a distance of about 300m to the E.
From the junction for the visitor centre, continue on the 4×4 track SE and down among meadows and increasingly regular clusters of trees. You’ll cross a stream after about 300m, then reach a three-way junction after another 370m. Continuing SE will take you to Hors Lake and beyond to the villages of Aghavnavank and Areni. Turn left and E to begin descending to the village of Hors on increasingly well-used dirt roads which weave down steeply through an ever-more-cultivated and wooded landscape. You may see one or more stone posts previously installed as guideposts for hikers. If in doubt, continue walking E down the valley and you will eventually reach the village. Follow the main thoroughfare down to reach the village centre, with a rest spot, drinking water, and a small convenience store.
Hors – Kishlak
From Hors village centre, walk 500m E down the T-9-27 road out of the village, then turn right at the drinking water fountain. You’ll pass the school on your left, and the entrance to the village cemetery on your right. At this point, walk S and cross the stream to pick up the start of a livestock trail dipping SE towards the top edge of the row of trees growing on the right riverbank. Once on this trail, it is relatively clear and easy to follow as it traverses up the mountainside in a SE direction, away from the bottom of the valley to the N. There are a couple of steep and eroded sections where the trail fragments into multiple paths, but all will converge on a single clear route, which continues to traverse uphill and SE at a consistent average gradient, reaching the ridge about 1.5km after leaving the village, where a scattered collection of khachkars will mark your arrival.
From the khachkars, contour the grassy hillside on a SW bearing towards the trees that line a small stream, where you’ll find a wide gap that allows you to easily pass through to the next field. Again, contour across the slope, but rather than enter the trees, turn right at the edge of the field and head directly uphill. After 75m you’ll reach a 4×4 track. Turn left and follow it E for 600m as it traverses through sparse woodland to bring you out onto the fields at a relatively new livestock watering point, which may or may not be working depending on the season.
This watering point is on the edge of a broad saddle on the ridge, with a small hilltop to the ENE. Head SE across the saddle as it slopes downhill and narrows into a ridge. After 300m, when the narrow ridge begins to drop, look for a narrow and very steep livestock trail on your right, which descends S into a gorge of orange-coloured earth below the ridge. This very tricky descent thankfully lasts only 220m or so before you reach the bottom of the tight, tree-filled gully. You may need to search to find the continuation of the trail up and out of the gully on the opposite side, but a clearly defined trail does exist – if you need to bushwhack or hike off-trail, you need to look harder! Once the trail is located, follow it up for maybe 50m to reach an open ridge, where the land becomes easier to navigate.
Once on the ridge, traverse ESE across the gentle hillside on the faint trail just below the ridge. After 250m or so you’ll meet the top of the ridge itself. Follow the wide ridge downhill among the junipers, wild almonds and thorny bushes for some 330m to reach the top edge of a flat meadow used for haymaking. Follow the E edge of this meadow around to its SE corner and you’ll find a rough trail dropping SW from the edge of the meadow into the valley below, curving round to the left to meet and cross the river. From here it’s an easy 2km walk on the 4×4 track along the quiet valley, following the stream down until you emerge onto open fields at the edge of the ruined village of Kishlak.
Kishlak – Shatin
From the 4×4 track above the ruins of Kishlak village, continue straight E for approximately 500m to where the track bends left to descend N from the ridge. Rather than follow this track, continue straight and E along the ridge and past the electricity pylon. Keep the rocky edge of the ridge on your right as you start to descend more steeply, and a better-defined path will become visible, zig-zagging S down the steep slope among loose rock and thorn bushes. As you reach the bottom of the slope, bear slightly right and continue down to the riverside. Cross the river and walk up the steep, narrow trail to emerge onto a sloping meadow dotted with trees.
The route from here follows the embankment alongside a disused irrigation canal which contours around the hillside above orchards next to the river below. Locating the start of the canal, however, can be somewhat challenging. Traverse the meadow on a contour from your current location, roughly S in direction, and above the three large trees in the middle of the meadow, for approximately 100m, neither climbing nor descending. The start of the canal should be directly in front of you, but you may have to find your way through some thorny overgrowth to locate it. If, after travelling more than 50m S beyond the edge of the meadow, you are still on a steep and overgrown hillside rather than a flat-topped embankment next to a dry and disused water channel, you are probably too high. If you find yourself in a clump trees at the top of another meadow, you are probably too low. Good luck!
Once you have located the route from the edge of the meadow, follow it for 650m (note that at the time of update this trail was still unmaintained and rather overgrown). The canal will vanish abruptly just before reaching a stream running down a side valley, having eroded away. Here it is easier to shortcut the original route of the canal, dropping down to the stream and climbing back up on the far side. You should be able to pick up the continuation of the canal by matching your elevation with the visible part of the canal that you’ve already followed on the hillside behind you, and continuing to traverse at that level.
The canal now continues on its contour for another 350m before again disappearing at the edge of a small, newly-planted apricot orchard. Cut NW and slightly uphill through the orchard to reach the 4×4 track that provides it with vehicle access. Follow this track W as it weaves uphill, bending S and crossing a small stream, then heading SE and again S to pass along the edge of several mature orchards.
You’ll shortly reach a crossroads, after which the track descends steeply for 200m to cross another stream. Cross this stream but then immediately turn right and follow a fainter 4×4 track S. This contours around to the E, passing a landslip (which incidentally blocks the track from being used by vehicles), where it forks slightly. Take the left fork to stay below the fenced orchard above and pass an old electricity pylon. From here the track bends right and dips into another small valley before heading E again and reaching a junction with a better dirt road. Continue E a few steps and look for a shortcut trail down to your left, which cuts off the hairpin bend in the road. Follow the shortcut, then cross the road again to find the continuation of that footpath, which drops steeply down to the E to meet the M-10 highway. Cross the highway, turn left and walk along the shoulder for 150m to the junction. Turn right and walk 400m along the road to the centre of the village of Shatin, with grocery stores, drinking water, and a pleasant rest spot.
Shatin – Shativank
From the 3-way junction of the T-9-42 and T-9-21 roads in the centre of Shatin, head E on the T-9-21 for 200m to reach a fork with some trailhead information panels, with the main road taking the left fork, and a signpost indicating trail users to take the right fork. This leads down to the riverside and some more information panels. Follow the dirt road right, across the road bridge over the river, and then following the uphill bend to the left on the far side, heading NE. Another 180m brings you to another fork; take the right fork to stay on the same dirt road. You’ll pass some ruined stone buildings, and after 140m come to a point at which a guidepost instructs you to climb the stony hillside to your right (if you reach the driveway of the next house you have gone too far). Many intertwining trails exist up this hillside, all leading diagonally and steeply up and NE among low walls, loose rock, and scrub. Your goal and orienting feature should be the electricity pylon, which is approximately 210m away on a 66º bearing from the roadside guidepost.
Having passed the pylon, you’ll find yourself on a small spur with a view over Shatin. You’ll also notice that the onward trail is significantly clearer and better defined. This is the historic route along the gorge between the Shatin and the nearby monastery of Shativank. The terrain being challenging and this historic trail the only way to pass it, navigation is quite simple for the majority of the route. You’ll climb steadily up through the gorge as it narrows, drawing closer to the stream at the bottom of the gorge as you ascend, and crossing it on a couple of occasions.
The trail remains clear for much of its 2.5km distance, branching in several directions as the valley opens up on the final approach to the monastery, which can make navigation very challenging. While this section of the trail remains undeveloped, the easiest way to continue is to pick your way E up the steep hillside in front of you to reach the dirt road 100m above (note that it may be invisible from below until you reach it) in order to complete the final few hundred metres to Shativank.
Shativank – Spitakavor Monastery
The route beyond Shativank is currently problematic, with no clearly defined existing route. This text describes the ‘least worst’ option. As well as the route described here, it is also possible to backtrack along the dirt road to the junction of what is officially classified as the T-9-40 but is in fact a very rough and, at its highest point, extremely steep 4×4 track; or, alternatively, to hike off-trail by heading N and uphill behind the monastery, then following the ridge up and E to a well-defined contour trail above.
From the end of the dirt road to Shativank, just before the stream crossing, take a SE bearing and locate the point at the top of the ridge that you’ll be aiming for, some 500m away in a straight line. Then, head E on the narrow trail up the valley, crossing the stream and continuing for 100m to where another path comes down from the monastery to join the trail. Cross the stream again and head SW and up for another 100m to reach the top of ridge. Your general route from here is to zig-zag up among the tree-lined terraces on the north-facing side of the ridge. However, until the route is clearly defined and marked, there are too many intertwined livestock trails for a single route to be described here. Make your way uphill as best you can, aiming for the point at the top of the hill you located earlier. You will, eventually, emerge onto flatter, more open ground, where the livestock trails all converge on a single drinking water trough. Once you’ve located this water source, contour 50m SW to meet the 4×4 track coming up from your right.
The track uphill of this point, technically the T-9-40 provincial road, has been referred to by more than one trail designer as the “Death March”. Brace yourself for an extremely steep and exposed climb up a loose and very rocky trail, the steepest part of which has been measured at a frankly despicable 45% gradient.
Some 500m beyond the spring, the track levels out and bears SE. From here, it is a more pleasant walk along a good dirt road that traverses much more gently around the southwest flank of the unnamed 2,051m peak above, covering about 3km before descending to meet another dirt road at a fork. The T-9-40 continues straight and S from here, leading down to the community of Vernashen; turn sharply left onto the T-9-41, which continues the traverse of the mountainside, bringing you to the bottom of the steps below Spitakavor Monastery after 1.4km. Climb the steps through the walnut grove to reach a drinking water source and the monastery itself.
Spitakavor Monastery – Vernashen
From the bottom of the steps leading to the monastery from the T-9-41 provincial dirt road, cross the road and locate the trail leading SSE down the narrow, wooded gully. Follow this trail steeply down the gully for about 200m and, as it begins to bear SSW, stay slightly right of the bottom of the gully to follow a clear but narrow trail along the hillside. About 350m later, the trail widens into what looks like a long-disused dirt road; here the trail drops to the left and winds around the hillside, soon meeting another stream-bed coming in from the N, then doubling back SE past the confluence and continuing downstream. About 350m beyond the confluence, the trail crosses the stream to the right and joins a dirt road on a hairpin bend. Turn left and follow this dirt road SSE for about 550m, crossing the stream twice, passing a farm and fenced orchard on the left, and emerging into an open field.
The trail across the field can be indistinct, but as long as you continue in the natural direction of the valley, you’ll be funnelled after 200m into the narrow gorge, where you’ll find a well-defined (and popular) historic footpath. It is practically impossible to get lost for the next 2km as you follow this dramatic canyon trail, with sheer cliffs on both sides, descending gradually, and eventually emerging out of the gorge into a widening valley above the community of Vernashen.
When you reach the dirt road (which you’ll have crossed on the route between Shativank and Spitakavor), turn left and follow it 50m down to the bottom of the hill, where it bends sharply right and continues SSW along the right bank of the river. After 420m the road forks; take the left fork to cross the river, and continue S along the tree-lined valley floor as you pass among the houses of Vernashen, reaching a T-junction with the H-48 main road after about 800m, where you’ll find several different information boards which all say the same thing.
Vernashen – Yeghegnadzor
This stage follows the tree-lined H-48 main road down through the communities of Vernashen and Gladzor, once villages in their own right but now subsumed into the urban sprawl of Yeghegnadzor. The road does become busier as you descend, but this is thankfully mirrored by the appearance of sidewalks. You’ll find several drinking water fountains and convenience stores alongside the road, which proceeds in a more or less straight line for 4.8km to reach the centre of the small city of Yeghegnadzor.
There are, of course, endless scenic routes you might take through the residential backstreets and outlying orchards and gardens of the two villages. Alternatively, at the other end of the scale, it is easy to hitch-hike or flag down a taxi and skip this uneventful road walk.
Yeghegnadzor – Arpi
From the centre of Yeghegnadzor, head SW on Grigor Narekatsi St, over the crossroads with Marshal Baghramyan St, and past the church on the S corner of this junction, which should be on your left. Continue 200m and follow the same road as it passes a right-hand junction and then bends sharply left, passing a drinking water fountain on your right at the bottom of a flight of steps to a hilltop chapel. Continue 120m past the water fountain to take the second turn on your right, threading among the buildings to proceed downhill and S on a dirt road, bringing you after 400m to the M-2 highway. Turn left and walk 170m along the side of the highway to reach the gates of the Arpa Protected Landscape Visitor Centre with its small cafe.
Cross the highway at the visitor centre gate and follow the dirt road, which is almost directly opposite, downhill and SSW (signposted for Dadal Bridge). This track bears S, passing along the base of the hillside to your left, and then, as the landscape flattens, between orchards on both sides. The track grows fainter as it nears the River Arpa, about 1.3km after leaving the highway, and narrows into a trail leading down to the riverbank, where the historic Silk Road-era Dadal Bridge spans the river.
Cross the bridge and follow the dirt road as it bends up to the right and proceeds NNW, tracing the left side of the River Arpa’s floodplain. The road forks at the start of a left-hand bend; take the right fork to stay close to the riverbank as the river meanders slowly to the left. About 400m beyond the fork you’ll come to another, modern bridge across the river. Turn right, cross the river and proceed 1.3km NW to reach Crossway Camping by the junction of the M-2 and M-10 highways; a popular rest-day location for thru-hikers on the TCT. To continue on the TCT, continue straight on past the bridge to rejoin the dirt road leading SW.
About 1.1km beyond the bridge, the river meanders W, whereas the main dirt road continues SW along the edge of several orchards which are irrigated from above by a canal coming down from a side valley about 1km further along the road. Continue along the same main dirt road, bearing roughly W at this point, still running alongside orchards, gradually bearing NW and down again towards the river, which eventually passes very close to the road at the narrowest point between the hillside to your left and the river to your right. From here the route descends to cross the floodplain itself, covering some 1.5km on a roughly W bearing across flat and sometimes waterlogged ground, before meeting another narrow point between the river and the hillside.
Here the road rises slightly to a flat spot between a fenced compound to your left and a footbridge to your right, which leads N across the River Arpa to a residential road at the southern edge of the village of Arpi. It is 400m from here to the M-2 highway and several convenience stores.
Arpi – Noravank
From the S end of the footbridge across the River Arpa to the village of Arpi, walk 30m W on the dirt road and then turn S to follow a narrow trail up the steep side valley and past the fenced compound housing a building on your left. This trail climbs the right-hand slope steeply for 350m, with what looks like a quarry (actually the entrance to a mineshaft) on your left, reaching a dirt road at the top of the steepest part of the slope. Follow the road as it zig-zags uphill another 400m to reach a saddle on the narrow ridge, where on the side of the road you’ll find a water pipe conveniently leaking a steady supply of drinking water. Heading across the saddle and 700m S up the next side valley will bring you to Jrovank, a small rock-hewn shrine next to the confluence of several streams. Continue SE from the saddle up the right side of the valley you’ve just climbed to stay on the TCT.
From the saddle, a historic rock-built trail leads up the steep valley side, with several khachkars lying on the hillside below, and a couple of right-hand junctions leading up to a viewpoint on the north end of the rocky ridge above, where you’ll also find traces of ruined stone buildings. Whichever route you take to the flat top of the ridge, continue S along the highest available ground until a 4×4 track emerges, leading roughly SE and uphill. This will eventually join a well-used dirt road coming in from the right.
From this junction, head SE and uphill on the dirt road, which passes close to the top edge of the steep slope to your left, and then across an open field, passing close to the base of a hill to your right about 700m beyond the junction. Turn right off the dirt road and bear directly S, walking off-trail across the field, for 300m. You’ll dip into a small gully and pick up a livestock trail, which crosses the gully and then bends right and WNW for another 150m to meet a 4×4 track. Cross the jeep track and continue W into the next gully, again following livestock trails downhill, to meet the same 4×4 track after 190m.
Follow the 4×4 track W as it traverses the open hillside, dipping into several small gullies, and eventually bearing NW to climb gradually among scrub and juniper bushes to reach the top of a rocky ridge after 2.3km. The track may seem to disappear; continue traversing to reach the highest point of the ridge, then head S and uphill along the top of the ridge for 300m. Whether or not you stay on the 4×4 track, you will at this point reach the wide, once-asphalted, now mostly gravel T-9-7 provincial road leading E to the village of Mozrov. Turn right and walk 300m along the road to reach the entrance to Mozrov Cave on your right. Turn left to continue on the TCT.
Walk 1km W on the T-9-7 road. It will dip S to cross two side valleys before heading N and downhill. As the slope to your left levels out, you’ll see a 4×4 track leading up to the left. Follow this uphill a few steps to approach two ruined stone buildings on the open hillside.
From this point, the trail is indistinct, but route-finding is relatively simple. You should aim to ascend into the side valley to your S, traversing the rocky hillside on the W side of the gorge. You’ll find yourself bounded on both sides by cliffs below and above, which limit the route options. If you find you need to scramble or climb, try a higher or lower route first.
Continue S and uphill into the gorge, possibly passing one or more cavern entrances in the limestone cliff above you. After maybe 600m the space between the cliffs above and below you will begin to tighten, funnelling you naturally towards the point where the valley ahead of you appears to open up again into a large, steep-sided bowl, with the faint ruins of stone buildings on the grassy hillside opposite and rocky crags high above. Here you’ll find a defined trail bearing right and crossing a very tight passage between rock features. You may need to scramble down from the upper rock ledge to the reddish earthen slope below, as the retaining wall below the trail here has collapsed and as of the time of writing had not yet been repaired. Continue another 100m on the now well-defined trail to meet the seasonal stream-bed at the bottom of the valley.
Cross the stream-bed, climb the grassy slope opposite to reach slightly flatter ground, and proceed W up the valley, hiking off-trail for about 250m until you reach a small gully, at which point you should be able to find a clear trail crossing it. Continue another 200m on this trail, then, as the stream-bed bears left, cross it to climb NW up the gentle hillside to your right, aiming for the saddle on the ridge above, which you’ll meet after about 180m, passing a single wild pistachio tree just before you reach it.
The trail continues WNW from the saddle on the north-facing side of the ridge, traversing on a contour among mature juniper trees, with panoramic views north across the grape-growing region surrounding Areni and Yeghegnadzor. After 260m you may notice a fork to your right, with another trail leading down to the E. This will take you after 450m to Archeri Karandzav (“Bears’ Cave”). Continue W past the fork to stay on the TCT.
The well-defined trail continues a further 250m along the hillside, bearing S through an area of bedrock towards a shallow gully. Follow the gully uphill and S, hiking off-trail for 250m, to reach a humanmade terrace in the hillside. Turn right and follow the terrace on a contour until you reach the ridge to the W, no more than 200m away. From here, continue off-trail along the same contour on a roughly SW bearing, covering approximately 700m and aiming for the gully just below the saddle in the next ridge, just left and W of an unnamed 1,846m peak. You’ll find a clear path crossing the gully; continue another 50m uphill to the top of the saddle.
From the saddle, an historic trail descends generally S from the ridge to the River Gnishik at the bottom of the so-called Noravank Gorge. The parts of the trail that pass through solid rock are generally easy to find, if somewhat overgrown and treacherous with loose rock. Where the route crosses open hillsides it is generally faint or invisible and you must navigate carefully to find the continuation of the route.
The first segment below the saddle to the base of the red cliffs is simple to follow as it zig-zags down. From the first tree on the slope below the base of the cliffs, descend 140m on a 165º bearing to the next group of small thorny trees. Bear slightly right to follow the broad ridge directly downhill for 130m, then, as the gradient begins to steepen, bear left again and head for the cluster of trees and boulders some 140m away on a 150º bearing. Pass through the trees and then walk another 130m on a 170º bearing to reach a gully crossing. As you do so, look for the well-defined trail traversing the hillside beyond the gully, which will help you locate the correct point to cross the gully and pick up the trail again.
This trail leads W across the hillside to reach the next sloping ridge after 250m. It continues round to head S across the hillside beyond, fading out at a flat spot on the next ridge some 250m later. Bear left to cross this saddle and then proceed downhill on a 165º bearing, roughly parallel to the shallow gully to your left, where a trail does exist but can be difficult to pick up. After about 200m you should pass a collection of low rock walls on your right, the route passing between these walls and the gully below. The valley and the trail begin to bear to the right, and after around 250m the trail becomes clearer, continuing on the right side of the valley floor, and traversing SW above steep slopes and rock outcrops. It makes an anticlockwise loop around the most prominent outcrop, zig-zagging down just W of the outcrop, looping around its base, and dropping back into the gully which is now to the NE, emerging onto an open sloping field.
Traverse the field on a contour and locate the concrete water holding tank. Pass this on its downhill side and cross the stream-bed through the trees. Just above and beyond the stream-bed you’ll find an overgrown trail traversing SW across the hillside, with a water pipe running along it. Follow this for 200m as it contours, soon bearing SE, and then, as the trail fades out above in a gap in the trees, hike off-trail diagonally downhill and S for no more than 100m to find a three-way junction with another trail. Turning left and uphill will take you on an extremely steep and treacherous zig-zag trail which acts as a shortcut to the monastery of Noravank above. Turn right and cross the small footbridge over the River Gnishik, clambering up the opposite bank to reach the asphalt road along the bottom of the gorge. Follow this road SE to take a slightly gentler (though still steep) route up to the monastery, as well as a side trail to the chapel of St Pokas and a little-known outdoor swimming hole. Cross the road and take a few steps to the right to find another junction heading left and SW, and to continue on the TCT.
Noravank – Nor Amaghu
From the signposted junction on the asphalt road next to the River Gnishik below Noravank monastery, follow the historic footpath SW through a thicket of trees and then WNW as it traverses up the mountainside. After about 550m, the trail will cross a sloping ridge, climb slightly, and then bear roughly WSW for another 350m, dipping into a gully and then continuing NNW for another 220m. You’ll reach the edge of the ruined village of Nor Amaghu and bear sharply left to proceed SW towards the former centre of the village, reaching a junction on your left after 200m and just after the track you’re following begins to curve gradually to the right.
Nor Amaghu – Gnishik
From the three-way junction in the centre of Nor Amaghu, the currently way-marked route makes a big loop around the modern buildings to pass a water source. If you don’t need water at this point, it’s much more efficient to turn left and head S on a track between ruined houses, bending right after 120m and climbing a short distance to rejoin the way-marked route. Make a sharp left and head generally E along the contour, making a sharp zig-zag to the right just after passing a more substantial ruined building on your right. Climb gradually on this footpath for another 270m, then follow the short zig-zags up to your left to reach a junction with a 4×4 track on a hairpin bend in the H-40 asphalt road, with several information panels and signs.
Continue E onto the 4×4 track and past the barrier gate. The track heads ENE and then SSE to traverse the slopes below Mt Amaghu (1,700m) and Mt Achalikar (2,118m), climbing as it does. There’s a covered picnic shelter 1.3km beyond the barrier gate, and after another 600m you’ll pass a spring on your right in a steep gully, which at times of low flow may be difficult to retrieve water from. Continue on the same jeep track, which climbs out of the gully for 150m and rounds a sloped ridge to reach a signposted junction. Turn left to descend N for 300m to a viewpoint on the clifftops above Noravank monastery. Continue past the junction to enter the area of Hin Amaghu (“Old Amaghu”), where only the terraced hillsides and a couple of roadside khachkars hint at the former village.
After 600m you’ll reach another signposted junction for another viewpoint, 650m down a side track to the left. Continue past this junction on the main track, which climbs for another 500m and then traverses flatter terrain for some 1.4km to reach a high point on the flat top of a ridge, with a deep gorge directly in front of you.
The eroded remains of the 4×4 track bear right and S, dropping into the gorge for 120m before vanishing completely at a large water pipe, which runs directly down the steep hillside. Before the pipe, look for the beginning of a footpath which doubles back to head NE on a gentle traverse of the slope, zig-zagging after 160m, and again after another 160m, before making some tighter turns through the rock features, descending steeply on rock steps at one point, to reach the bottom of the vegetated gully coming down from your right. After exiting the vegetated gully on the far side, the trail traverses the steep hillside E, continuing along the south side of the gorge, with the River Gnishik cascading below. After some 1.5km the trail meets the valley floor and a 4×4 track takes the place of the footpath. Especially in summer, it can sometimes be difficult to locate the trail here due to undergrowth, but after about 400m you’ll reach a junction with another 4×4 track among the riverside trees. Turn left and ford the River Gnishik to its north bank.
Across the river, you’ll find a clearing with a caravan and some beehives, known locally as Jafar Grove. From here it is possible to follow the jeep track NE to the village of Gnishik, but the way-marked footpath continues along the gorge, turning right off the 4×4 track just beyond the caravan. This rock-hewn footpath through the scenic gorge crosses the river on a couple of occasions but stays primarily on the northern bank, delivering you after just over 2km to the base of a steep, grassy hillside at the top of the gorge. From here it’s a steep, 450m walk uphill, first on an eroded tangle of trails and then on a grassy 4×4 track, to reach the edge of the village itself. Turn left and proceed 220m uphill to a T-junction with the H-40 provincial road from Yeghagnadzor to Gnishik.
Gnishik – Horadis
From the junction on the H-40 main road from Yeghegnadzor, head E on the dirt road (officially still the H-40) running along the upper edge of the village. This dirt road will take you out of the village and up the valley on a gentle gradient, in a generally SE direction, traversing cultivated fields and wildflower meadows. The road is well used and easy to follow.
After just under 4km you’ll pass a picnic shelter with a drinking water source just below. Beyond here the road starts to bear S to follow the overall shape of the valley as you begin to approach the pass, and side roads become more numerous. Follow the same main track for another 1km to a fork, with the right branch, the H-40, heading W (signposted Khndzorut), and the left branch heading S and uphill. Take this left branch and head S, bearing SE after 150m, and climbing approximately another 150m to reach the pass (2,405m), with the peak of Mt Sartsakar (2,613m) to the E, and the ridge running W to the border with Nakhichevan, some 2km distant.
Follow the 4×4 track ESE on an undulating traverse of the mountainside, with panoramic views of this remote southern border region of Vayots Dzor province. After 1km you’ll cross a gully and reach flatter ground at the edge of a wildflower meadow, where the road may appear to vanish. It is easy to lose the route here, either because of long grass or haymaking in progress. The easiest way to navigate this short off-trail section is to walk on a contour across the lower part of the sloped field, using the two spring water sources as your anchor points. The first spring is about 600m beyond the gully you crossed as you reached the field, the second is another 600m beyond, and both are more or less equal in elevation. After locating the second spring, the continuation of the trail should be visible, traversing the hillside ahead of you as it bears SE. Pick up this trail and follow it for the 1.4km as it contours across to reach a 4×4 track on a flat spot on the next ridge.
From this junction with the 4×4 track, walk S along the track on the ridge for 85m, then follow it sharply left and down to the E (note that the ground is badly eroded here and the first 100m of track can be very indistinct). Once the track becomes well-defined, it is a simple case of following it down, steeply at times, to reach a T-junction after 2km with a better-defined track. Turn left, cross the stream, and follow this track N as it crosses another stream and climbs NE into Horadis, where you’ll find a spring on your left, just opposite the church on your right.
Horadis – Martiros
From the roadside spring opposite the church in the middle of Horadis, walk E along the dirt road, past the seasonal farm on your right, and downhill out of the village. The track weaves down and SE to meet the river below, passing a single stone building and a grove of aspen trees containing a picnic table. Cross the stream and follow the road (officially now the T-9-11 provincial road) E as it descends through meadows, again crossing the same stream after 900m.
This dirt road now follows an unusually straight and flat alignment ESE, bending and dipping only to cross side valleys and their streams. You’ll cover about 7.5km in this way, crossing meadows and cultivated fields, the ridge above and to the left gradually descending to meet you. At this point, maps will show the T-9-11 breaking off to the left and zig-zagging downhill; ignore this junction and continue straight along the flat ridge-top to descend a final 1.5km to the H-42 asphalt road.
Cross the road and continue on the 4×4 track directly opposite, which first heads NE and then quickly bears right between sparse rows of trees. The route traverses the north-facing slopes E, dipping to cross several streams, and then after 2km meeting another asphalt road, the T-9-38. Turn right and walk up the road into the modern village of Martiros, passing among rows of houses and then climbing to reach a T-junction near the top of the village after 1.5km.
Martiros – Old Martiros
From the T-junction between the T-9-38 and T-9-43 provincial roads, head N along the T-9-43 and follow it around the north side of the hill above for 1.6km. You’ll leave the modern village of Martiros and reach the edge of the old village, passing among the gardens and reaching another T-junction. Turn left here and follow the dirt road downhill among the houses, passing the entrance to the church complex on your right and reaching the village square just below and to the N.
Old Martiros – Gomk
From the village square, head ESE on the narrow dirt road that passes directly alongside the lower wall of the church complex. After about 260m the rough track bears left and downhill. Exit the track and continue straight, using the stone blocks in front of you as steps to pass between the trees and cross the grassy orchard on a livestock trail. This trail heads SE, leaves the village gardens and starts to descend a rocky slope, bearing S around the base of the hill to become a 4×4 track running up the bottom of this small valley, with the River Martiros to your left. Follow this track S for 500m to reach a junction, then turn left and down to cross the river via a long stretch of loose stepping stones. Having reached the other bank, follow the track as it zig-zags right and then left to climb the hillside diagonally and NE, reaching a junction with another 4×4 track about 450m beyond the river crossing. Turning right here will take you after 1km to the rock-hewn Martirosats cave church. Turn left to continue on the TCT.
Follow the 4×4 track NE as it contours around the hillside. You’ll see the small Lake Chumov in the bowl of the valley ahead, and after 300m a junction with a footpath to your right; an alternative side route to Martirosats cave church. Continue another 375m to find a junction to your left, which may be difficult to find. This leads you N on a faint trail, following a low ridge between Lake Chumov to the left and an area of overgrown wetland to the right. Stay on high ground to avoid getting lost as you proceed N, and as you approach the large standing khachkars ahead of you, bear right and NE to cross the stream flowing out of the wetland to your right. After the stream crossing, bear once again N to traverse alongside the right bank of the stream. You’ll pass a freshwater spring as the trail becomes more defined and bears left through some trees as it follows the hillside around to the W. The area here is a somewhat confusing tangle of signposts and junctions, but the basic principle is to ascend N up the hillside to your right along a historic and well-defined zig-zag trail, covering about 650m from bottom to top and emerging on a flat spot on the ridge-top where you’ll find several prominent boulders. Loop left past the boulders and continue N along and up the hillside, zig-zagging twice more before you reach the plateau at the top of the climb. Walk about 120m on a 125º bearing across the field to reach a 4×4 track on the edge of another area of wetland.
Continue 250m S on the 4×4 track to reach a junction with another 4×4 track coming steeply up from the valley below, just before an isolated tree on the edge of the plateau. Turn sharply left here to head E, following the base of the hillside meeting the S edge of the plateau. You’ll ascend gradually in a generally NE direction for about 1.1km, crossing a couple of streams and passing above more wetland areas. As the track bends to the right and begins to climb S up the hillside, turn left onto a narrow footpath heading NNW on an uphill traverse of the slope ahead of you. This trail contours the hillside for about 900m to reach the wide, open saddle E of the small peak of Karhan (2,222).
The trail can be hard to find as it crosses the area of flat grassland on top of the saddle; try to stay on a level contour as you follow the hillside round to the right and onto a NE bearing. As the side-slope grows steeper, the trail should become more distinct and easier to find, passing the spring at the base of the hillside about 35m uphill. Continue NE as the track meets the edge of another plateau, using the two springs rising at the base of the hillside as navigational aids if necessary.
After passing above the second spring on this plateau (which also features an animal watering trough), follow the faint 4×4 track NE across the meadow and away from the base of the hillside to your right. After some 420m you’ll reach the NE corner of the meadow on the top edge of a steeper north-facing slope. From here the 4×4 track is much clearer, being cut into the steep hillside. Follow this track as it traverses E, keeping left at the fork after 400m, and passing the piped drinking water point below the waterfall in a gully 150m later. Walk another 150m NNE on the track, and keep a sharp eye out for a junction with a trail on the right, which you should follow off the dirt road to continue traversing the hillside.
The trail now passes through an area of small, terraced meadows, dotted with small trees and shrubs. Depending on the time of year, the height of the grass, and whether haymaking has begun, this area can be difficult to navigate. Your goal is the point 450m from the junction on a 62.5º bearing, some 20m higher in elevation, at the opposite edge of the meadow, where you’ll find a newly built footpath leading E across the steep, scrubby hillside.
Having located the continuation of the trail, follow it E across the terraced mountainside and among the shrubs and small trees that characterise this north-facing slope. Navigation is easy as there are no junctions; you’ll make two zig-zags 600m beyond the meadows, and then continue on a rough contour for about 1.5km, gradually bearing right and around the mountainside until you are bearing SE towards a set of stables with a fenced paddock. The trail descends from its contour to meet a dirt road just before the stables and before meeting a stream coming down from the S. Turn sharply left and proceed N along this road, which descends, steeply at times, down the valley towards the village of Gomk, traversing the same hillside at a much lower elevation, after 1.8km reaching a T-junction with the T-9-31 asphalt road leading into the village.
Turn right and walk 175m around the right-hand bend in the road, where the second turn on the left (heading NE) will take you down into the village on a residential dirt road. Take the right fork after 300m, then walk another 180m E across the open hilltop and down to the next T-junction, with the ruined church directly to your right, and a small chapel surrounded by khachkars a few steps away to your left.
Gomk – Kapuyt
From the junction at the NE corner of the ruined church in the centre of the village, head NE and downhill to follow the hillside between rows of houses (some ruined, some inhabited). You’ll descend steeply to reach another T-junction. Turn right and continue no more than 50m around the right-hand bend, then take the junction on your left and head E and downhill on the zig-zag 4×4 track that leads down into the valley below the village. Follow this down until just before you reach the tree-lined riverbank, then look to your right to locate the livestock trail leading up the valley in a SE direction.
Follow the livestock trail upstream for 200, then cross the river, keeping the large metal water pipe on your left. Continue upstream along the opposite riverbank. After some 370m the trail will again cross the river, again with the water pipe to your left. Continue in the same direction across open ground for 150m to find a third river crossing. After another 100m there is a fourth and final river crossing, this time crossing a tributary coming in from the left to meet the river you’ve been following. From here the trail climbs steeply and diagonally up the hillside in a SE direction, entering the ruins and orchards on the lower edge of the hamlet of Kapuyt, and climbing to reach the T-9-31 dirt road after 450m.
Turn right on the T-9-31 and take a few steps to find the start of a 3.5km side trail up the valley to Lake Gomk. Turn left to continue on the TCT, after another 450m reaching a signposted T-junction in the centre of Kapuyt.
Kapuyt – Artavan
From the signposted T-junction in the centre of Kapuyt with the trailhead information panel, climb the dirt road up the valley to the E. You’ll pass the lower edge of a fenced garden with a house at the upper edge. Walk 80m beyond the SE corner of this garden to find a fork in the track. Turning left and uphill here will take you past a collection of cliff-carved khachkars and along a 1km side trail to a natural rock arch higher up the gorge. Continue straight and E, above and in parallel with the river to your right, to stay on the main route of the TCT.
After 600m you’ll pass another fork on your left with the side trail coming back from the rock arch. Cross the river just after this point and continue upstream on the southern bank of the river for another 420m. Here the valley opens up into a deep, cliff-lined bowl. Make a sharp right turn and climb no more than 15m to reach the first of several zig-zags which will take you up the steep, shrubby, north-facing slope of the gorge.
This footpath passes among bushes, small trees, and areas of bare rock, zig-zagging another five times over the next 1.5km of climbing, with the final turn just below the base of a set of sheer cliffs. From here, the trail proceeds in a straight-line uphill traverse ESE for 850m, growing steeper as it climbs. As the trail appears to vanish into impassable terrain, you’ll suddenly find yourself climbing an historic, rock-built, zig-zag staircase directly up the extremely steep hillside, making around twenty tight turns as it gains almost 100m of elevation. As the trail emerges from the bushes and rocks onto slightly gentler and more open grassland, it will make a final left turn to head SE and diagonally uphill on the right side of the now-shallower gully. Some 200m later, cross this gully and pick a path up and N through the boulder field, reaching the top of the sloping ridge about 80m later.
Follow the sloping ridge uphill and E. After about 200m you’ll see a clear trail leaving the ridge to make a traverse of its left side, curving left towards the base of a stack of cliffs. Follow this trail until you find yourself on a flat rock ledge, with sheer cliffs both above and below. Carefully follow this ledge round and to the right as it continues on a contour towards the top of the gorge, heading E. The cliffs will soon give way to grassy slopes, and the trail will continue on its contour, bearing gradually NE and eventually reaching the midway point of the top edge of the gorge, with a view back down to the same valley floor you previously followed as you departed Kapuyt.
Continue a few steps along the rim of the gorge to the first bedrock feature, then turn right and traverse downhill and E, passing above a spring and reaching the 4×4 track below after maybe 80m. You’ll now follow this track down to the NW, following the shallow valley running between the two rows of cliffs (not visible from within the valley) that look down upon Kapuyt to your left and Artavan to your right. It is a gentle 2.3km walk along this track, crossing the stream on a couple of occasions, to reach a signposted fork, from where the main 4×4 track on the left traverses up and away from the valley floor. Take the right fork and follow the livestock trail among patches of scrub as it parallels the stream to the right, passing an animal watering trough after 150m and then continuing to follow the stream down the valley, reaching after another 600m a small farm with a trailer and a fenced animal enclosure. At the top of the ridge above and to the right of the farm is an excellent viewpoint, as well as the start of an extremely steep shortcut trail down through the forest to the fields on the outskirts of Artavan.
Pass the farm and continue traversing the hillside on a contour with the stream-bed on your right. After about 300m you’ll reach the top edge of the predominantly oak forest that dominates this north-facing mountainside above Artavan; the only such forest in the region. Just as it appears that you are walking off-trail into the trees, you’ll find the start of a historic footpath, which weaves its way down and generally WNW into the forest. You’ll cross the right side of a grassy clearing after about 450m and pick up the trail again at the clearing’s NE corner, continuing on what is now a 4×4 track for another 250m to a second clearing. The track continues from the northern tip of this clearing, then zig-zags down through the forest on a clear and easily navigable route towards Artavan, which is now to the NE. About 160m beyond the second zig-zag, as the track descends N, look to the right to find a series of small caves in a rock formation above the trail. Another 240m beyond this, the way-marked route continues straight on to meet another trail coming in from the W and then proceed into Artavan, but you can take a shortcut from here, turning right off the 4×4 track onto a narrow footpath, which descends 200m to the top edge of the open meadow at the bottom edge of the forest. Continue across the meadow in the same direction for another 200m to meet the junction with the way-marked trail, which now follows a dirt road NE with a small river to your right.
Follow the dirt road for 320m, then turn right and cross the river. Take the second, upper dirt road to the left, which leads NE along the hillside, with trees and a cemetery to your right, then bending right and passing among the first houses and gardens. As the road bears E it will drop into the valley to a junction at the SW end of a historic bridge across the River Artavan. Cross the bridge, pass the trail information panel on your right, and follow the rocky road up and left to climb up towards the village centre, arriving after 350m at a T-junction with the continuation of the T-9-36 provincial road from Vayk, with a convenience store on your right, and, on the far side of the junction, another trailhead information panel and a drinking water fountain.
Artavan – Andranik’s Fortress
From the T-junction at the village centre, head SE on the main road through the village for 90m, then take the first left fork uphill and E. Climb another 80m then take the left fork again to continue climbing NE (the right fork is actually a private driveway). You’ll pass the last house on the right after another 80m and then continue straight uphill to the NE, with a fenced orchard to your right. Continue uphill, passing the campsite in the fenced field above the orchard to your right. As the 4×4 track bears left and away from the fenced field, continue straight ahead, keeping to the right of the small stream, and cross a small irrigation channel leading to the campsite, before following the steep and braided livestock trail more or less straight up the hillside in front of you.
The livestock trail climbs steeply E for about 300m before crossing the same 4×4 track as it zig-zags up the hillside. Cross the track and continue on the same livestock trail as it climbs diagonally left, and then bears right to curve around the hilltop ahead of you and emerge onto the flat top of the ridge about 350m beyond and E of the 4×4 track crossing. From here the trail crosses the open ground on top of the long ridge in a generally ENE direction, following the route used traditionally by livestock and their herders coming from Artavan to the pastures above. After 250m you’ll begin to pass among the ruins of the mediaeval village of Martuz, with its hilltop cemetery at the eastern end of the former settlement.
The livestock trail breaks up somewhat after passing a rocky area below and just to the right of a high point on the ridge. At this point you should bear NE, following what looks like the remains of a former historic road across a flat patch of land. After about 175m the terrain begins to climb again, and you should be able to see a clear trail leading NE and diagonally up the west-facing slope. Some 350m uphill the trail will reach the top edge of the slope and join another trail at a fork coming in from behind and to the right. The trail now bears N as it continues to climb, lined with large rocks and having a distinctly humanmade feel, curving right around the hillside and meeting a 4×4 track after another 250m. Keep right and follow the 4×4 track for 300m as it bears SE onto flatter ground, meeting a junction with the causeway across the outflow of Lake Hayeli to your N.
The trail now heads generally SE, following the 4×4 track about 950m to reach higher ground on the stepped plateau above the lake. The track bears ENE and shortly reaches a signposted junction on the edge of the meadow. Continue straight for another 200m, slightly to the left of the 4×4 track that can be seen climbing steeply up the mountainside ahead of you, to bear N on a contour across the hillside. The trail can be very hard to find at this point; you should aim to maintain your elevation, following one of the terraces N along the hillside for about 900m until you are directly due E of the northern edge of Lake Hayeli in the valley below. Here you are looking for the entrance to a well-defined footpath climbing diagonally up the steep hillside ahead of you. This trail bears slightly left as it climbs, reaching the ridge after about 300m, and then traversing it for another 150m to reach some low ruined walls at a flat spot on the ridge. Climbing the ridge W for 80m will take you to the substantial ruins of Andranik’s Fortress.
Andranik’s Fortress – Gndevank
From the flat spot on the ridge below Andrank’s Fortress, walk downhill for 350m on a 75º bearing, descending the grassy hillside among shrubs and rocks to reach a rough and rarely-used but clearly visible 4×4 track, leading E and downhill to the edge of a meadow on the valley floor below. Depending on the time of year, there may or may not be a 4×4 track to follow, and the exact alignment may change year on year. In any case, from the point at which the 4×4 track reaches the meadow, take a 20º bearing and walk another 400m across the meadow to reach another clear 4×4 track. Turning right on this track will take you after 2km to the farming hamlet of Ughedzor. Turn left to continue on the TCT.
The trail from here follows a faint 4×4 track between meadows used for haymaking, which themselves are interspersed with areas of scrub and rock. Navigation can therefore be somewhat unpredictable and very much dependent on seasons and local traffic levels. You will generally traverse the bowl of the valley in a clockwise direction for about 1km, descending only gradually; then you’ll descend more steeply and generally N for a further 1.4km, the track becoming more defined as you progress. You will eventually reach a T-junction with a substantial dirt road, just E of a metal barrier gate which restricts vehicle access to a local conservation area.
Turn left at the T-junction, pass the barrier gate and proceed among the areas of wetland. After about 300m, after the last stream crossing in the wetland area, the trail will begin to climb steeply; cut right from here to traverse the short ridge N for about 80m, staying as low as possible but above the waterside overgrowth, to reach a disused 4×4 track leading W into the trees. Follow this track W (note that this segment can be waterlogged and overgrown in places), bearing NW and emerging onto drier, more open land after about 450m. Continue on a NW bearing to traverse the narrow strip of meadow with a row of trees to the left, then, after the last tree, bear N and make your way off-trail down the sloping ridge. After perhaps 450m you’ll reach the base of the hillside and the flat meadowland to the E of a small reservoir in a shallow bowl.
Continue N across the meadow for about 120m to reach a sharp left-hand bend in the stream to your right. Find a suitable place to cross this deep channel, then join the dirt road just beyond it, which leads NW on a gently weaving traverse of the meadows, following the left bank of a small irrigation canal. It will begin to descend the north-facing hillside on a W bearing, crossing the canal after about 700m, and then bearing right and NNE after a further 400m. Continue downhill and NNE another 350m to reach flatter land and the top edge of an area of terraced, tree-lined meadows used for haymaking. Continue downhill and N to reach the W end of the first row of trees, then turn left before the trees and follow their alignment W for about 100m to reach a substantial dirt road. Follow this dirt road W as it climbs very gradually and then descends the open hillside, after 850m reaching a fork in the road on the top edge of a young apricot orchard.
Take the right fork and proceed down among the apricot trees, resisting the urge to stop and eat as many of them as possible. The track descends WNW and then N along a sloping ridge to meet another junction after 700m, again at the top of an orchard, and with tracks leading in several directions.
From here, the remainder of the route down to the M-2 highway crossing is off-trail, with occasional traces of old trail. Descend some 50m to your right and into the shallow valley, then follow it directly downhill, staying on the left side of the valley floor, in a roughly N direction. Around 500m further down the valley, the gradient will begin to steepen and become more scrubby. Bear left before this point, traversing the open ground WNW and away from the steepening gully you’ve been following, but maintaining a downhill trajectory, with the highway visible below you. Several livestock trails make their way downhill in a roughly W direction from here. Aim for the point at the bottom of the hillside which is opposite the cluster of buildings on the other side of the highway. Carefully descend the final few metres of this steep and rocky slope to meet the M-2 highway opposite the roadside buildings, which you may be interested to discover are actually part of a small restaurant complex.
From the restaurant, walk W along the right-hand shoulder of the M-2 highway for 300m, then turn right off the road and onto a small flat area, with the entrance to a narrow side valley about 120m ahead of you. This off-trail segment involves following the side valley up in a generally NW direction; the suggested route starts on the right bank but crosses to the left bank after about 100m, then traverses the hillside above the trees that grow in the stream bed, which will be dry in summer months. After 500m (as the crow flies), the valley will fork, with the left fork heading W; follow the right fork NNW, then, as the valley curves left, cross it and follow the opposite hillside. You’ll bear WNW and then meet the ridge at a point 560m (as the crow flies) beyond the fork on a 311º bearing.
Cross the 4×4 track running along the ridge, and head NNE on the trail that runs alongside a disused canal. Walk 200m, then shortcut down the slope to pass to the right of the electricity pylon. Follow the faint 4×4 track downhill from here in an NW direction, then after 250m turn right to follow the remains of another canal as it contours NE and then NW around the hillside. After 110m, when you reach the sharp right turn, turn left and shortcut NW down the hill for 90m to reach the dirt road at the corner of the apricot orchard. Follow this dirt road NW as it crosses the river running down past the orchards, traversing the hillside down, passing more electricity lines, and meeting the H-43 main road to Jermuk after 800m.
Cross the H-43 main road to find the start of a zig-zag gravel road descending W to the bottom of the canyon in front of you. Follow this once-asphalted road all the way down to the River Arpa, which you last crossed on the historic Dadal Bridge south of Yeghegnadzor. The gravel road flattens out and heads N before it crosses the river, passing between farm buildings on the valley floor and then turning left to cross the river and meet the H-44 at a T-junction. Turn right and follow the H-44 partly asphalted road N and upstream along the gorge for about 4.5km to reach a junction on your right. Turning right here will take you up after 670m to the monastery of Gndevank, still an active seminary and inhabited by monks, as well as the start of a historic footpath weaving up the side of the gorge to the village of Gndevaz on the clifftops above, should you need to resupply at this point.
Gndevank – Kechut Reservoir
From the junction below the monastery of Gndevank between the road leading to the monastery and the H-44 provisional road, head N to follow the road upstream along the gorge, following the W bank of the River Arpa. This road was blocked for several decades by several major rockfalls following an earthquake in the late 1980s [check date], but was fully cleared in early 2021 and is once again accessible by vehicles, though the threat remains of further rockfall at any time. An immensely scenic route along the bottom of the gorge, it has long been a popular walking and cycling alternative to the highway above the gorge and to the E, which is now the main to Jermuk. You’ll follow it for 6.6km as it climbs steadily up the gorge, emerging just SW of the dam at the downstream end of Kechut Reservoir as the cliffs give way to a wider valley.
You’ll meet a fork just before reaching the dam; keep left and climb, passing above the buildings just before the dam to reach a junction with a road that crosses the top of the dam to the E. Continue straight and NNE, past the barrier gate on the road and the nearby security kiosk, to proceed along the W side of Kechut Reservoir. Note that due to the supposed ‘strategic importance’ of the dam, it is not advised to deviate from the suggested route, or to take photos or otherwise loiter in the vicinity.
Kechut Reservoir – Jermuk
From the W end of the dam at the downstream end of Kechut Reservoir, having passed the barrier gate across the H-44 asphalt road, walk NNE along the H-44 for exactly 1km. On the hillside to your left, you’ll see six identical residential buildings facing the reservoir in a staggered formation, with a single central building in front of them. When you are directly in front of the last (ie: the most northeasterly) of the six residential buildings, turn left to follow the side road N and diagonally uphill. The road will bear left to end in front of the building, keep right and proceed onto a 4×4 track, past the sign warning about forest fire prevention, and around the uphill bend to the left. This 4×4 track weaves its way uphill for 230m in a generally WNW direction to meet another 4×4 track traversing the hillside above the cluster of buildings behind you.
Follow this track N, past the left turn 100m ahead of you, as it bends to the NW and enters the forest after another 300m. The track now ventures up the valley in a generally N to NNW direction, undulating for a few hundred metres before climbing steadily, with several minor river crossings and waterlogged sections which may require wading. After 1.5km you will cross the river and immediately meet a T-junction with a very well-used 4×4 track running east-west. This is the route used by the 4×4 drivers who bring tourists from Jermuk to the nearby hot springs. Turn left at this junction and follow this side trail, possibly battling with 4×4 drivers and tourists, to reach the hot springs after 580m. Turn right to continue on the TCT.
From the T-junction, this muddy and rocky 4×4 track climbs the south-facing side of the valley through the forest in a generally SE direction, thankfully meeting the grassy plateau above the valley after about 450m. From here, head N on a fainter 4×4 track, bearing NE after about 500m (possibly at a seasonally-dependent fork in the track) to cross a shallow rise in the terrain and meet a well-used 4×4 running alongside and above a river in a shallow valley. Turn left onto this track and follow it about 270m NNW, where it meets the river to your right and crosses it at a ford. Continue 100m beyond the river as the track climbs slightly to a fork. Keep right and cross the meadow to another river crossing some 200m away. Cross this river and the canal branching off it, and head NE on the left fork of the 4×4 track, which now climbs gradually away from the river you’ve just crossed, reaching a high point on the meadow after about 750m, then flattening out and slightly descending for 250m to yet another small stream crossing. Cross this stream and then follow the same track as it traverses around the gentle hillside, curving slightly to the left and away from the buildings ahead of you. After some 360m you’ll meet a junction with multiple tracks leading in all directions. Turn slightly right and head downhill and E on the only track that descends the hillside, which quickly zig-zags left and N to continue downhill, emerging after 650m at the S corner of the Jermuk mineral water bottling plant. Walk 100m to reach the front gates of the compound, then turn right and walk 160m down to a large road junction with the H-44 main road, which more or less divides the residential zone of Jermuk to the S with the touristic zone to the N and NE.
Menu
Route Resources
Partners & Sponsors
This section of the Transcaucasian Trail was developed between 2016–2018 with the generous support of the following organizations, as well as individual donors to the Transcaucasian Trail Association.
To become a TCTA member and support more trail development projects like this one, join here.